Installing a hardwired GPS tracker on an excavator takes 15 to 20 minutes once you know where to tap three wires: power, ground, and ignition sense. This guide walks through the full installation for the four most common excavator brands — Caterpillar, Komatsu, John Deere, and Volvo — plus the tools you need, where to mount the unit, and when you should upgrade to a CAN bus telematics install for fuel, DEF, and fault-code data.
Before you start, one thing worth calling out: there are two categories of excavator trackers, and the install process depends on which one you're using. The simpler option is an ignition-sensed hardwired tracker — three wires, 15-20 minutes per machine, and you get location, engine hours, runtime, and voltage. The more advanced option is a CAN bus telematics device that taps the J1939 diagnostic port and pulls the same OEM data a factory-installed system would — fuel level, hydraulic temps, fault codes, DEF levels, and more. This guide is the step-by-step for the 3-wire ignition-sensed install, with a section at the end on when the CAN bus upgrade is worth the extra time.
Key Takeaways
- A hardwired 3-wire install (power, ground, ignition sense) takes 15-20 minutes on most excavators for a trained installer.
- Hapn's hardwired trackers accept 9-48V DC, so the same device works on both 12V and 24V machines without a converter.
- Every install needs an inline 2-3A fuse on the red power wire, mounted within 12 inches of the battery tap.
- Ignition sense should be confirmed with a multimeter — a miswired ignition circuit is the #1 cause of inflated engine hours.
- If the machine has a J1939 diagnostic port, a CAN bus telematics device unlocks fuel, DEF, hydraulic temps, and fault codes that a 3-wire tracker cannot see.
Which tracker type are you installing?
Before you pull any wires, confirm which tracker is on your bench. The install procedure, the data you get, and the install time all depend on it.
What is an ignition-sensed hardwired tracker?
A 3-wire GPS device that connects to battery positive, chassis ground, and a key-on ignition circuit. Reports location, engine hours (from ignition runtime), voltage, and movement. Installs in 15-20 minutes on most equipment. This is the standard choice for rental fleets and general asset visibility.
What is a CAN bus telematics device?
A tracker that taps the machine's J1939 diagnostic port to read OEM engine and hydraulic data directly from the ECU. Install typically takes 30-45 minutes and requires a J1939 harness. Delivers fuel level, DEF level, hydraulic temp, idle time breakdowns, and full fault-code streams in addition to everything the ignition-sensed tracker provides.
If you need location, engine hours, and basic utilization — go with the 3-wire ignition-sensed install below. If you need fuel burn, fault codes, or OEM-level diagnostics, skip to the CAN bus section at the bottom. Both options run on the same Hapn platform, so a mixed fleet (some 3-wire, some CAN bus) reports into a single dashboard — a core design choice for teams running Hapn across construction and equipment rental operations.
Section 1: What You'll Need
Before you open any panels, lay out the parts and tools. Nothing slows an install down like realizing mid-job you don't have an inline fuse holder.
Parts
- Hapn hardwired GPS tracker (HT1 or equivalent 3-wire device)
- Inline 2-3A fuse holder with ATC/ATO blade fuse
- Heat-shrink butt connectors or Posi-Tap solderless connectors (recommended over crimps alone)
- Adhesive-backed mounting pad or 3M VHB tape (if not using screws)
- Zip ties, 6-inch and 12-inch, UV-rated
Tools
- Digital multimeter (for verifying ignition sense)
- Wire strippers and crimpers
- 10mm, 12mm, and 13mm sockets (standard for most excavator battery terminals)
- Heat gun or lighter (for heat-shrink)
- Flashlight or headlamp
- Smartphone to verify tracker check-in on the Hapn dashboard
PPE
- Safety glasses
- Cut-resistant gloves
- Steel-toed boots
- High-visibility vest if installing on an active job site
Time estimate: 15-20 minutes per machine for a trained installer. Add 10-15 minutes the first time you work on a new brand or model.
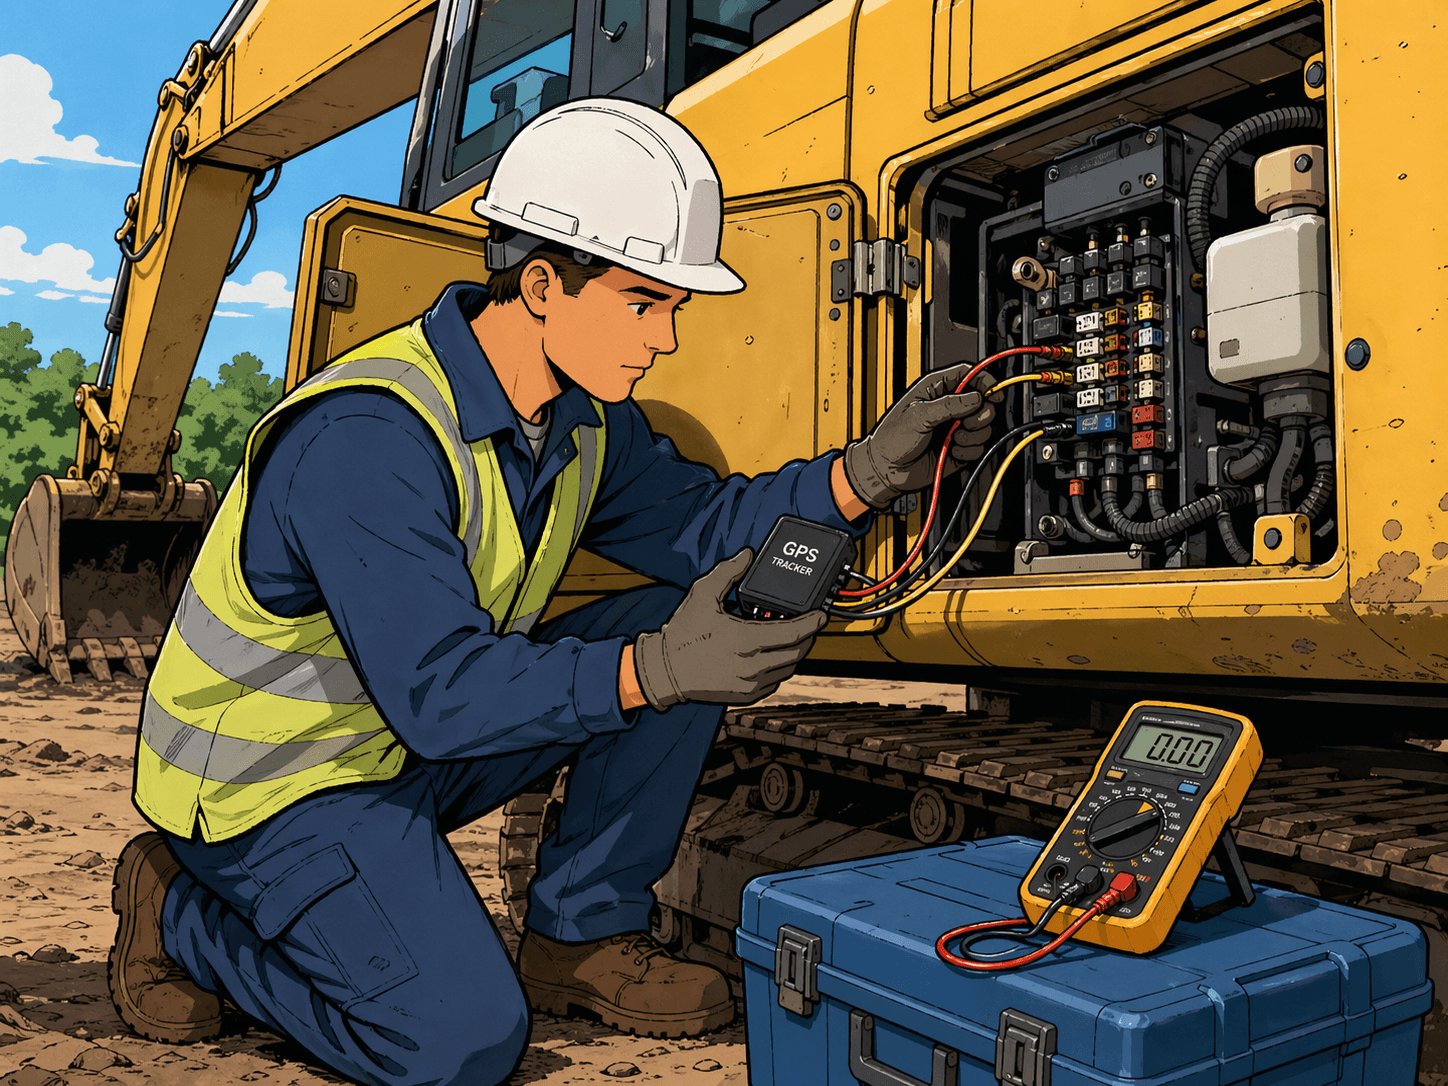
Section 2: The 3-Wire Connection Explained
Every ignition-sensed hardwired tracker uses the same three wires. Get these right and the tracker does everything you need — miswire one and you either get no data or wildly inflated engine hours.
Red wire — Power. Connects to a constant 12V or 24V source, typically battery positive or a constant-hot terminal at the fuse panel. Hapn's hardwired trackers accept 9-48V DC, so the same device works on both 12V and 24V excavators without a step-down converter. Always install an inline 2-3A fuse within 12 inches of the battery tap. Skipping the fuse is the fastest way to void your install warranty and start an engine fire.
Black wire — Ground. Connects to the chassis (a clean, paint-free bolt on the frame) or directly to battery negative. Battery negative is preferred on machines with heavy electrical noise — older Deere and Volvo excavators in particular. Make sure any chassis ground point is scraped to bare metal and protected with dielectric grease after tightening.
White or yellow wire — Ignition sense. Connects to a circuit that goes hot only when the key is turned to the "run" position. This is what tells the tracker the machine is on, which is how engine hours and runtime are calculated. Typical voltage on key-on is 10-14V (12V system) or 20-28V (24V system). A wire that reads voltage with the key off is not a valid ignition sense — that's constant hot, and using it will cause the tracker to log engine hours 24/7.
Fuse recommendation: 2A is enough for every Hapn hardwired unit. A 3A fuse is acceptable if you're using an existing inline holder. Anything above 5A is oversized and defeats the purpose of having a fuse at all.
Need the hardware?
Hapn's hardwired trackers ship ready to install with the fuse holder, connectors, and mounting pad in the box. 9-48V input, IP67-rated, works across every major excavator brand.
See Hapn Hardware →Section 3: Step-by-Step Installation
Follow these ten steps in order. Skipping any of them — especially steps 3 and 10 — is where most bad installs come from.
- Disconnect the machine battery. Turn the key to off, disconnect the negative battery terminal, and tuck the cable away so it cannot flip back onto the post. On most excavators the battery is in a lockable compartment behind the cab or in the rear engine bay.
- Locate the ignition circuit. The easiest access point is the fuse panel inside the cab, usually under the right armrest or beside the operator's seat. Look for circuits labeled "ACC," "IGN," or "RUN." On older machines without labeled fuses, you'll access the ignition circuit directly behind the key switch.
- Test the ignition wire with a multimeter. Back-probe the candidate wire, set your multimeter to DC volts, and confirm: 0V with the key off, 12V or 24V with the key in "run," and 0V with the key off again. If the wire stays hot with the key off, it's constant-hot — keep looking.
- Mount the tracker. Pick a location that is dry, has a clear view of the sky (or is close to it), and isn't directly on top of hot metal. Recommended locations: dash trim area behind the operator's seat, the inside of the rear service cover, or the cab ceiling liner. Use adhesive mounting if the surface allows; otherwise screw-mount with standoffs to avoid grounding the enclosure to the chassis.
- Connect the red wire (power). Route the red wire to battery positive or an always-hot terminal at the fuse panel. Install the inline fuse within 12 inches of the tap. Use a heat-shrink butt connector; do not rely on a bare crimp or electrical tape.
- Connect the black wire (ground). Ground to battery negative (preferred) or a clean, bare-metal chassis bolt. If chassis grounding, scrape off paint and apply dielectric grease after tightening to prevent corrosion.
- Connect the white/yellow wire (ignition sense). Tap into the verified ignition circuit using a Posi-Tap or T-tap. Do not use a scotch-lock connector — they fail in 18-24 months of machine vibration.
- Verify tracker LED status before reassembling. With the battery reconnected and the key in "run," the tracker LED should show a solid or slow-blink pattern indicating power and cellular/GPS lock. If the LED is off, check your power and ground. If the LED is fast-blinking, it usually means no cellular signal yet — wait 2-3 minutes for first check-in.
- Reconnect the battery and tidy the install. Reconnect the negative terminal, zip-tie the harness to existing runs (never tie-wrap to a fuel line, hydraulic hose, or hot exhaust component), and close up any panels you removed.
- Start the machine and confirm reporting in the Hapn dashboard. Log into Hapn, find the asset, and confirm that (a) the unit is checking in, (b) the ignition status flips from "off" to "on" when you turn the key, and (c) engine hours are incrementing only while the machine is running. If ignition status stays "on" after you turn the key off, you have the wrong wire — go back to step 3.
Section 4: Brand-Specific Notes
Every excavator brand has its own quirks. These are the ones we see most often across the 463,000+ assets monitored on the Hapn platform.
Caterpillar (CAT 313 - 325)
CAT excavators in the 313-325 range have a labeled fuse panel under the right armrest. The "ACC-2" slot is a reliable ignition-sensed circuit on most post-2015 machines. Power tap is easiest at the battery disconnect switch in the rear compartment. Mount the tracker inside the cab ceiling liner for best GPS reception — the steel cab roof will attenuate signal if the unit is placed in the engine bay.
Komatsu (PC200 - PC290)
Komatsu PC200-series machines have a J1939 diagnostic port under the operator's seat on the right side — if you're considering the CAN bus install, Komatsu is one of the easiest brands to upgrade. For the 3-wire install, the ignition circuit is accessible behind the main instrument cluster; pull the trim ring, and look for the wire that reads 24V with key-on. Komatsu is a 24V system on these models, so confirm your tracker accepts 24V input (Hapn's 9-48V range covers it).
John Deere (210G - 350G)
Deere G-series excavators have a fuse panel that flips down from above the operator's left shoulder. Slots labeled "IGN" or "KEY" are the safe taps. Grounding on Deere machines is best done at battery negative rather than chassis — electrical noise on the frame can cause intermittent check-ins if you go to chassis ground. Watch for the factory telematics harness (JDLink); if it's already present, the ignition tap at the fuse panel is still fine, but confirm with a multimeter.
Volvo (EC200 - EC300)
Volvo EC-series machines route the ignition circuit through the CareTrack telematics module. Tap the ignition wire at the fuse panel — not at the CareTrack harness — to avoid interfering with Volvo's factory system. Preferred mount location is the right-side cab pillar, behind the trim. Volvo uses a 24V electrical system across this range.
Section 5: Common Installation Mistakes
We see the same five errors come back from field techs across every brand. Avoiding them takes less than 60 seconds per machine.
- Miswiring the ignition sense to a constant-hot circuit. Engine hours inflate 24/7, utilization data becomes meaningless, and you waste hours on a fleet-wide audit to find which machines are affected. Always multimeter-verify before tapping.
- Skipping the inline fuse. A short in the harness goes straight to the battery with no protection. Fire risk is real. Fuses cost 50 cents.
- Mounting on bare metal without a standoff. The tracker enclosure can short against chassis ground, especially on older machines with compromised paint. Use adhesive pads or screw with plastic standoffs.
- Exposing wiring to weather or hot engine components. UV degrades standard wire insulation in 2-3 years. Zip-tie runs inside existing harness channels and avoid routing near exhaust manifolds or hydraulic hoses.
- Skipping the dashboard verification step. An install isn't done until you see the asset check in on the Hapn dashboard with correct ignition status. Walking away without verifying is how fleets end up with "installed" trackers that never reported.
Avoiding these five is the difference between a tracker that quietly drives utilization and theft recovery outcomes for three years and one you end up reinstalling next season. For teams trying to put a dollar value on that, our fleet tracking ROI calculator walks through the math.
Section 6: When to Use CAN Bus Telematics Instead
The 3-wire install gives you location, engine hours, runtime, and voltage — enough for most rental, utilization, and theft-recovery use cases. But if you need any of the following, switch to a CAN bus telematics device that taps the J1939 port:
- Fuel level and fuel burn per hour
- DEF level (critical for Tier 4 Final compliance)
- Hydraulic oil temperature
- Real-time fault codes and diagnostic trouble codes (DTCs)
- Idle time broken out from total runtime
- OEM-reported odometer/hourmeter (more accurate than ignition-derived)
CAN bus installs typically take 30-45 minutes instead of 15-20 because you're working with a dedicated J1939 harness and confirming the correct 9-pin or 6-pin Deutsch connector. The upside is that you get the same data stream factory OEM systems provide — on the same Hapn dashboard, alongside your 3-wire assets. Mixed-fleet operators generally run 3-wire trackers on smaller, lower-value assets and CAN bus on high-value machines where fuel burn, DEF, and fault codes justify the extra setup.
We'll publish a full CAN bus install guide in the next post in this series. In the meantime, Hapn's equipment tracking page covers the full platform side — dashboards, alerts, AEMP integrations, and API access — regardless of which tracker hardware you deploy.
Stop Guessing. Start Tracking.
See how Hapn gives you complete visibility across your mixed fleet — excavators, loaders, trucks, trailers, and attachments in one platform. No contracts, transparent pricing, and free install support for every customer.
Get Pricing →Written by the Hapn Team
Hapn provides GPS fleet and asset tracking for 50,000+ customers across construction, equipment rental, and 50+ other industries. Our platform monitors 463,000+ assets and processes over 4 billion messages annually with 99.9% uptime. We've supported installations on every major excavator brand from CAT and Komatsu to Deere, Volvo, Hitachi, Kobelco, and Hyundai.
Frequently Asked Questions
How long does it take to install a GPS tracker on an excavator?
A trained installer can complete a 3-wire hardwired install in 15-20 minutes per machine. First-time installs on an unfamiliar brand typically take 25-35 minutes. A CAN bus telematics install via the J1939 port takes 30-45 minutes because it involves confirming the correct diagnostic connector and harness routing.
Do I need a mechanic to install a GPS tracker?
No. Any person comfortable with basic 12V/24V automotive wiring, a multimeter, and crimp connectors can install a hardwired tracker. Most Hapn customers have their own shop techs or rental yard staff handle installs. For fleets of 10+ machines, Hapn offers install support and can connect you with regional install partners.
Will installing a GPS tracker void my excavator warranty?
A properly installed aftermarket GPS tracker — one that uses inline fuses, isolated taps, and doesn't modify factory harnesses — does not void OEM powertrain or hydraulic warranties under the Magnuson-Moss Act in the US. What can void warranty is splicing into factory CAN bus harnesses incorrectly or bypassing factory telematics modules. Using Posi-Tap or T-tap connectors at the fuse panel is the safe approach.
What happens if I wire the ignition sense incorrectly?
If ignition sense is tied to a constant-hot circuit, the tracker will log engine hours 24/7 — your utilization data will be inflated, maintenance intervals will fire early, and ignition-based geofence alerts will misfire. The fix is to disconnect the ignition wire, re-verify with a multimeter that the candidate circuit is truly key-switched, and re-tap. You can correct the engine hour offset in the Hapn dashboard without losing historical data.
Can I install a GPS tracker on my excavator myself?
Yes, for the 3-wire ignition-sensed install. It's a 15-20 minute job with basic tools — multimeter, wire strippers, crimpers, and a socket set. Follow the 10-step procedure above, verify each wire with a multimeter, and confirm dashboard check-in before walking away. For CAN bus telematics installs, most customers prefer a trained installer because the J1939 connector and pinout vary by brand and model year.
What's the difference between a hardwired GPS tracker and a telematics device?
A hardwired GPS tracker uses 3 wires (power, ground, ignition) and reports location, engine hours, runtime, and voltage. A telematics device adds a CAN bus connection to the J1939 port and pulls OEM-level data: fuel level, DEF, hydraulic temps, fault codes, and precise idle-vs-work time. Hardwired trackers install in 15-20 minutes; telematics devices take 30-45. Both run on the Hapn platform, so a mixed deployment shows up in a single dashboard.